Sunday, April 27, 2014

How do I get album pictures using facebook API?

 
  1. From the first call you get all the albums (and the album IDs) '/me/albums'
  2. from there you can get the album picture (cover) '/'+album.id+'/picture'
  3. AND the photos of the album '/'+album.id+'/photos'
 
 
 FB.api("/"+albumid+"/photos",function(response){
    var photos = response["data"];
    document.getElementById("photos_header").innerHTML = "Photos("+photos.length+")";
    for(var v=0;v<photos.length;v++) {
        var image_arr = photos[v]["images"];

        var subImages_text1 = "Photo "+(v+1);

        //this is for the small picture that comes in the second column
        var subImages_text2 = '<img src="'+image_arr[(image_arr.length-1)]["source"]+'" />';

        //this is for the third column, which holds the links other size versions of a picture
        var subImages_text3 = "";

        //gets all the different sizes available for a given image
        for(var j = 0 ;j<image_arr.length;j++) {
            subImages_text3 += '<a target="_blank" href="'+image_arr[j]["source"]+'">Photo('+image_arr[j]["width"]+"X"+image_arr[j]["height"]+')</a><br/>';
        }
        addNewRow(subImages_text1,subImages_text2,subImages_text3);
    }
});

How to Retrieve Facebook Post all Comments Using Graph API

See below example:

You need to call it from a secure request https and provide an access_token:

https://graph.facebook.com/19292868552_118464504835613/comments?access_token=XXX
EDIT:
Added the object from the post document. try clicking the comments connection and then remove the access_token and try and see the difference.


  accepted
It is very simple - all you have to do is query https://graph.facebook.com/POST_ID with a valid access token. You can rad more here :
https://developers.facebook.com/docs/reference/api/

Oracle - difference or changes between two rows from two tables


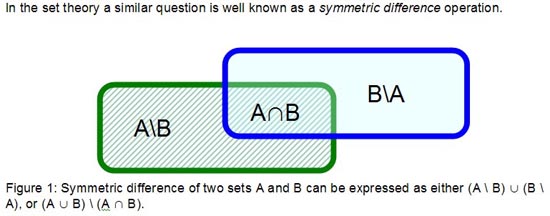
In the above figure we read the "/" as "not in" and the "∪" as "union".   In sum, we want the table comparison SQL to find:
 
select *
from 
(
( select * from employee1
  minus 
  select * from employee2)
union all
( select * from employee2
  minus
  select * from employee1)
)

Tuesday, April 22, 2014

How To Setup google blogger integrate to domain in bigrock hosting[Solved]

Blogger is one of the biggest platform for create blogs free. As i discussed in my recent article about blogs and creating your free blogs under blogger. I suggest you before processing must take look on
After creating your new blog, its URL is sub-domain of blogger and look like mysite.blogspot.com but if you want to hide blogspot or want to give pro name then you have to use custom domain which makes your site URL mysite.com instead of mysite.blogspot.in. For more details about domain must take look on what are domain names.?

Now in this article i want to discuss about using Bigrock domain as custom on blogger. Bigrock is a trusted network. I also register many domains under bigrock. so i also suggest my friends and users about bigrock.
Before proceeding if you don't have domain name then i suggest to buy from bigrock and must use our Discount coupon code
If you have domain name under Bigrock and you don't know how to set domain your domain on you blogs. Then i will try to explain all these things step by step and request you to follow all steps carefully.

big rock domain
  • Firstly open your bigrock domain manage account at bigrock.com.
  • After Log in your Account select list orders from menu bar and Then  click on then domain name which you want use.
  • After then go to the DNS Management of your domain name

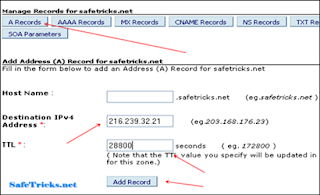
  • Then create A Records of domain by using Add A Records and you have to create 4 different A records using these Ips one by one
A records

216.239.32.21
216.239.34.21
216.239.36.21
216.239.38.21
Leave name column blank use above Ips in Destination IPv4 Address and and use TTL value 28800.
A records list
After creating 4 different A Records now time is to Cname for your domain
Go to Cname records column tab and and click on Add Cname record
www in Name box and put Value ghs.google.com and TTL 28800 and save your cname record.

cname record

Now all the steps are completed here to set domain for blogger. now  time is to confirm your identity and to verify your authority on both domain and also also blogs follow fellow step

Domain Setup and Blog verification


  • Log in your blogger account and select your blog where you want to set domain name
  • Go to Setting Tab >> Then Basic >> Publishing Blog Address >> Add Custom Domain name >> Switch To Advance Settings now type your domain name in box and click on save button.
  • Then your blog ask you to verify authority on that domain name. Now you have to create another cname record in Domain DNS to verify.
verify blogger
  • Simply add cname as we have done for adding www and ghs.google.com, no need to create it again. Create cname only using verification codes
  • First code in  Name box and Second long code in Value Box of Cname and add TTL 28800.
Now After following all above steps carefully it may take few hours to updates DNS settings and blog verification. After few hours add domain name again by switching custom settings in your blogs.
At last i hope you don't face any problem in setting domain on your blogs. If have domain under another  registrar then all steps above are almost same as we done for bigrock.

Friday, April 18, 2014

How to assign on select option to other select option using javascript doubleclick event example

See the below code example : 

<select name="function_id[]" id="function_id" size="5" multiple="multiple" style="width: 240px" ondblclick="delFunc()">
 </select>


<select name="avail_func" id="avail_func" size="5" style="width: 240px" ondblclick="addFunc()"><option value="64">test</option>

<option value="65">test1</option></select>
<script>

function delFunc() {
                var elm = document.getElementById('function_id');
                while (elm.selectedIndex > -1) elm.options.remove(elm.selectedIndex);
                }
 function addFunc() {
                var elm1 = document.getElementById('avail_func');
                var elm2 = document.getElementById('function_id');

                if (elm1.selectedIndex > -1) {
                                var new_id = elm1.options[elm1.selectedIndex].value;
                                var new_name = elm1.options[elm1.selectedIndex].text;
                                var alreadythere = false;

                                for (i=0; i<elm2.options.length; i++)
                                                if (elm2.options[i].value == new_id) alreadythere = true;

                                if (! alreadythere) elm2.add(new Option(new_name, new_id));
                }
                }


</script>

Double click to assign your select value:

Tuesday, April 15, 2014

PHPMailer Mailer Error: Language string failed to load: data_not_accepted [SOLVED]

Go through the below steps :

I've experienced the same data_not_accepted problem.
This error is thrown by phpmailer/class.phpmailer.php, but it doesn't tell much, so I added

    var $SMTPDebug    = true;

 I found out that the problem was due to a connection timeout (the default is set to 10 sec in phpmailer/phpmailer/class.phpmailer.php), so I removed the debug line in admin/class.phplistmailer.php, and added the following line:

Set the value 60 instead of 10
    var $Timeout = 60;


I'm still testing it, but it seems to work better, I hope I don't have to give up with phpmailer

Monday, April 14, 2014

Cross-Site Scripting example

Cross-Site Scripting

Cross-site scripting ('XSS' or 'CSS') is an attack that takes advantage of a Web site vulnerability in which the site displays content that includes un-sanitized user-provided data. For example, an attacker might place a hyperlink with an embedded malicious script into an online discussion forum. That purpose of the malicious script is to attack other forum users who happen to select the hyperlink. For example it could copy user cookies and then send those cookies to the attacker.

Details

Web sites today are more complex than ever and often contain dynamic content to enhance the user experience. Dynamic content is achieved through the use of Web applications that can deliver content to a user according to their settings and needs.
While performing different user customizations and tasks, many sites take input parameters from a user and display them back to the user, usually as a response to the same page request. Examples of such behavior include the following.
  • Search engines which present the search term in the title ("Search Results for: search_term")
  • Error messages which contain the erroneous parameter
  • Personalized responses ("Hello, username")
Cross-site scripting attacks occur when an attacker takes advantage of such applications and creates a request with malicious data (such as a script) that is later presented to the user requesting it. The malicious content is usually embedded into a hyperlink, positioned so that the user will come across it in a web site, a Web message board, an email, or an instant message. If the user then follows the link, the malicious data is sent to the Web application, which in turn creates an output page for the user, containing the malicious content. The user, however, is normally unaware of the attack, and assumes the data originates from the Web server itself, leading the user to believe this is valid content from the Web site.
For example, consider a Web application that requires users to log in to visit an authorized area. When users wish to view the authorized area, they provide their username and password, which is then checked against a user database table. Now, assume that this login system contains two pages: Login.asp, which created a form for the users to enter their username and password; and the page CheckCredentials.asp, which checks if the supplied username/password are valid. If the username/password are invalid, CheckCredentials.asp uses (for example), a Response.Redirect to send the user back to Login.asp, including an error message string in the query string . The Response.Redirect call will be something like the following.
Response.Redirect("Login.asp?ErrorMessage=Invalid+username+or+password")
Then, in Login.asp, the error message query string value would be displayed as follows:
Using this technique, when users attempt to login with an invalid username or password, they are returned to Login.asp and a short message is displayed indicating that their username/password were invalid. By changing the ErrorMessage value, an attacker can embed malicious JavaScript code into the generated page, causing execution of the script on the computer of the user viewing the site. For example, assume that Login.asp is being called using the following URL.
As in the code for Login.asp, the ErrorMessage query string value will be emitted, producing the following HTML page:
The attacker embedded HTML code into this page in such a way that when users browse this page, their supplied username and password are submitted to the following page.
http://www.hax0r.com/stealPassword.asp
An attacker can send a link to the contrived page via an email message or a link from some message board site, hoping that a user will click on the link and attempt to login. Of course, by attempting to login, the user will be submitting his username and password to the attacker's site.

Prevention

Cross-site scripting is one of the easiest attacks to detect, yet many Intrusion Prevention Systems fail to do so. The reason why cross-site scripting can be easily detected is that unlike most application level attacks, cross-site scripting can be detected using a signature. The simple text pattern
To accurately detect cross-site scripting attacks the product must know where and when to look for that signature. Most cross-site scripting attacks occur either with error pages or with parameter values. Therefore the product needs to look for cross-site scripting signatures either within parameter values or within requests that return error messages. To look for signatures in parameters values the product must parse the URL correctly and retrieve the value part and then search for the signature on the value while overcoming encoding issues. To look for signatures in pages that return error messages the product needs to know that the specific URL returned an error code. Intrusion Detection and Prevention Systems which are not Web application oriented simply do not implement these very advanced capabilities.