Differentiate between Real DOM and Virtual DOM.
Real DOM vs Virtual DOM
| Real DOM | Virtual DOM |
|---|
| 1. It updates slow. | 1. It updates faster. |
| 2. Can directly update HTML. | 2. Can’t directly update HTML. |
| 3. Creates a new DOM if element updates. | 3. Updates the JSX if element updates. |
| 4. DOM manipulation is very expensive. | 4. DOM manipulation is very easy. |
| 5. Too much memory wastage. | 5. No memory wastage. |
2. What is React?
- React is a front-end JavaScript library developed by Facebook in 2011.
- It follows the component-based approach which helps in building reusable UI components.
- It is used for developing complex and interactive web and mobile UI.
- Even though it was open-sourced only in 2015, it has one of the largest communities supporting it.
3. What are the features of React?
Major features of React are listed below:
- It uses the virtual DOM instead of the real DOM.
- It uses server-side rendering.
- It follows uni-directional data flow or data binding.
4. List some of the major advantages of React.
Some of the major advantages of React are:
- It increases the application’s performance
- It can be conveniently used on the client as well as server-side
- Because of JSX, code’s readability increases
- React is easy to integrate with other frameworks like Meteor, Angular, etc
- Using React, writing UI test cases become extremely easy
5. What are the limitations of React?
Limitations of React are listed below:
- React is just a library, not a full-blown framework
- Its library is very large and takes time to understand
- It can be a little difficult for novice programmers to understand
- Coding gets complex as it uses inline templating and JSX
. What is JSX?
JSX is a shorthand for JavaScript XML. This is a type of file used by React which utilizes the expressiveness of JavaScript along with HTML-like template syntax. This makes the HTML file really easy to understand. This file makes applications robust and boosts their performance. Below is an example of JSX:
1 2 3 4 5 6 7 8 9 10 11 | render(){
return(
<div>
<h1> Hello World from brnfullstack!!</h1>
</div>
);
}
|
7. What do you understand by Virtual DOM? Explain it's working.
A virtual DOM is a lightweight JavaScript object which originally is just a copy of the real DOM. It is a node tree that lists the elements, their attributes, and content as Objects and their properties. React’s render function creates a node tree out of the React components. It then updates this tree in response to the mutations in the data model which is caused by various actions done by the user or by the system.
This Virtual DOM works in three simple steps.
- Whenever any underlying data changes, the entire UI is re-rendered in Virtual DOM representation.

- Then the difference between the previous DOM representation and the new one is calculated.

- Once the calculations are done, the real DOM will be updated with only the things that have actually changed.

8. Why can’t browsers read JSX?
Browsers can only read JavaScript objects but JSX is not a regular JavaScript object. Thus to enable a browser to read JSX, first, we need to transform the JSX file into a JavaScript object using JSX transformers like Babel and then pass it to the browser.
9. How different is React’s ES6 syntax when compared to ES5?
Syntax has changed from ES5 to ES6 in the following aspects:
- require vs import
1 2 3 4 5 | var React = require('react');
import React from 'react';
|
- export vs exports
1 2 3 4 5 | module.exports = Component;
export default Component;
|
- component and function
1 2 3 4 5 6 7 8 9 10 11 12 13 14 15 16 17 18 19 | var MyComponent = React.createClass({
render: function() {
return
<h3>Hello brnfullstack!</h3>
;
}
});
class MyComponent extends React.Component {
render() {
return
<h3>Hello brnfullstack!</h3>
;
}
}
|
- props
1 2 3 4 5 6 7 8 9 10 11 12 13 14 15 16 17 18 19 20 | var App = React.createClass({
propTypes: { name: React.PropTypes.string },
render: function() {
return
<h3>Hello, {this.props.name}!</h3>
;
}
});
class App extends React.Component {
render() {
return
<h3>Hello, {this.props.name}!</h3>
;
}
}
|
- state
1 2 3 4 5 6 7 8 9 10 11 12 13 14 15 16 17 18 19 20 21 22 23 24 25 26 | var App = React.createClass({
getInitialState: function() {
return { name: 'world' };
},
render: function() {
return
<h3>Hello, {this.state.name}!</h3>
;
}
});
class App extends React.Component {
constructor() {
super();
this.state = { name: 'world' };
}
render() {
return
<h3>Hello, {this.state.name}!</h3>
;
}
}
|
10. How is React different from Angular?
React vs Angular
| TOPIC | REACT | ANGULAR |
|---|
| 1. ARCHITECTURE | Only the View of MVC | Complete MVC |
| 2. RENDERING | Server-side rendering | Client-side rendering |
| 3. DOM | Uses virtual DOM | Uses real DOM |
| 4. DATA BINDING | One-way data binding | Two-way data binding |
| 5. DEBUGGING | Compile-time debugging | Runtime debugging |
| 6. AUTHOR | Facebook | Google |
React Components – React Interview Questions
11. “In React, everything is a component.” Explain.
Components are the building blocks of a React application’s UI. These components split up the entire UI into small independent and reusable pieces. Then it renders each of these components independent of each other without affecting the rest of the UI.
12. What is the purpose of render() in React.
Each React component must have a render() mandatorily. It returns a single React element which is the representation of the native DOM component. If more than one HTML element needs to be rendered, then they must be grouped together inside one enclosing tag such as <form>, <group>,<div>, etc. This function must be kept pure i.e., it must return the same result each time it is invoked.
13. How can you embed two or more components into one?
We can embed components into one in the following way:
1 2 3 4 5 6 7 8 9 10 11 12 13 14 15 16 17 18 19 20 21 22 23 24 25 | class MyComponent extends React.Component{
render(){
return(
<div>
<h1>Hello</h1>
<Header/>
</div>
);
}
}
class Header extends React.Component{
render(){
return
<h1>Header Component</h1>
};
}
ReactDOM.render(
<MyComponent/>, document.getElementById('content')
);
|
14. What is Props?
Props is the shorthand for Properties in React. They are read-only components that must be kept pure i.e. immutable. They are always passed down from the parent to the child components throughout the application. A child component can never send a prop back to the parent component. This helps in maintaining the unidirectional data flow and is generally used to render the dynamically generated data.
15. What is a state in React and how is it used?
States are the heart of React components. States are the source of data and must be kept as simple as possible. Basically, states are the objects which determine components rendering and behavior. They are mutable unlike the props and create dynamic and interactive components. They are accessed via this.state().
16. Differentiate between states and props.
States vs Props
| Conditions | State | Props |
|---|
| 1. Receive initial value from the parent component | Yes | Yes |
| 2. Parent component can change the value | No | Yes |
| 3. Set default values inside the component | Yes | Yes |
| 4. Changes inside the component | Yes | No |
| 5. Set the initial value for child components | Yes | Yes |
| 6. Changes inside child components | No | Yes |
17. How can you update the state of a component?
State of a component can be updated using this.setState().
1 2 3 4 5 6 7 8 9 10 11 12 13 14 15 16 17 18 19 20 21 22 23 24 25 26 27 | class MyComponent extends React.Component {
constructor() {
super();
this.state = {
name: 'Maxx',
id: '101'
}
}
render()
{
setTimeout(()=>{this.setState({name:'Jaeha', id:'222'})},2000)
return (
<div>
<h1>Hello {this.state.name}</h1>
<h2>Your Id is {this.state.id}</h2>
</div>
);
}
}
ReactDOM.render(
<MyComponent/>, document.getElementById('content')
);
|
18. What is the arrow function in React? How is it used?
Arrow functions are more of a brief syntax for writing the function expression. They are also called ‘fat arrow‘ (=>) the functions. These functions allow to bind the context of the components properly since in ES6 auto binding is not available by default. Arrow functions are most useful while working with higher-order functions.
1 2 3 4 5 6 7 8 9 10 11 12 | render() {
return(
<MyInput onChange={this.handleChange.bind(this) } />
);
}
render() {
return(
<MyInput onChange={ (e) => this.handleOnChange(e) } />
);
}
|
19. Differentiate between stateful and stateless components.
Stateful vs Stateless
| Stateful Component | Stateless Component |
|---|
| 1. Stores info about component’s state change in memory | 1. Calculates the internal state of the components |
| 2. Have authority to change state | 2. Do not have the authority to change state |
| 3. Contains the knowledge of past, current, and possible future changes in state | 3. Contains no knowledge of past, current, and possible future state changes |
| 4. Stateless components notify them about the requirement of the state change, then they send down the props to them. | 4. They receive the props from the Stateful components and treat them as callback functions. |
20. What are the different phases of React component’s lifecycle?
There are three different phases of React component’s lifecycle:
- Initial Rendering Phase: This is the phase when the component is about to start its life journey and make its way to the DOM.
- Updating Phase: Once the component gets added to the DOM, it can potentially update and re-render only when a prop or state change occurs. That happens only in this phase.
- Unmounting Phase: This is the final phase of a component’s life cycle in which the component is destroyed and removed from the DOM.
In case you are facing any challenges with these React interview questions, please comment on your problems in the section below.
React Interview Questions
21. Explain the lifecycle methods of React components in detail.
Some of the most important lifecycle methods are:
- componentWillMount() – Executed just before rendering takes place both on the client as well as server-side.
- componentDidMount() – Executed on the client-side only after the first render.
- componentWillReceiveProps() – Invoked as soon as the props are received from the parent class and before another render is called.
- shouldComponentUpdate() – Returns true or false value based on certain conditions. If you want your component to update, return true else return false. By default, it returns false.
- componentWillUpdate() – Called just before rendering takes place in the DOM.
- componentDidUpdate() – Called immediately after rendering takes place.
- componentWillUnmount() – Called after the component is unmounted from the DOM. It is used to clear up the memory spaces.
22. What is an event in React?
In React, events are the triggered reactions to specific actions like mouse hover, mouse click, keypress, etc. Handling these events is similar to handling events in DOM elements. But there are some syntactical differences like:
- Events are named using camel case instead of just using the lowercase.
- Events are passed as functions instead of strings.
The event argument contains a set of properties, which are specific to an event. Each event type contains its own properties and behavior which can be accessed via its event handler only.
23. How do you create an event in React?
1 2 3 4 5 6 7 8 9 10 11 12 13 | class Display extends React.Component({
show(evt) {
},
render() {
return (
<div onClick={this.show}>Click Me!</div>
);
}
});
|
24. What are synthetic events in React?
Synthetic events are the objects which act as a cross-browser wrapper around the browser’s native event. They combine the behavior of different browsers into one API. This is done to make sure that the events show consistent properties across different browsers.
25. What do you understand by refs in React?
Refs are the shorthand for References in React. It is an attribute that helps to store a reference to a particular React element or component, which will be returned by the components render configuration function. It is used to return references to a particular element or component returned by render(). They come in handy when we need DOM measurements or to add methods to the components.
1 2 3 4 5 6 7 8 9 10 11 12 13 14 15 16 17 18 | class ReferenceDemo extends React.Component{
display() {
const name = this.inputDemo.value;
document.getElementById('disp').innerHTML = name;
}
render() {
return(
<div>
Name: <input type="text" ref={input => this.inputDemo = input} />
<button name="Click" onClick={this.display}>Click</button>
<h2>Hello <span id="disp"></span> !!!</h2>
</div>
);
}
}
|
26. List some of the cases when you should use Refs.
Following are the cases when refs should be used:
- When you need to manage focus, select text or media playback
- To trigger imperative animations
- Integrate with third-party DOM libraries
27. How do you modularize code in React?
We can modularize code by using the export and import properties. They help in writing the components separately in different files.
1 2 3 4 5 6 7 8 9 10 11 12 13 14 15 16 17 18 19 20 21 22 23 24 25 26 27 28 | export default class ChildComponent extends React.Component {
render() {
return(
<div>
<h1>This is a child component</h1>
</div>
);
}
}
import ChildComponent from './childcomponent.js';
class ParentComponent extends React.Component {
render() {
return(
<div>
<App />
</div>
);
}
}
|
28. How are forms created in React?
React forms are similar to HTML forms. But in React, the state is contained in the state property of the component and is only updated via setState(). Thus the elements can’t directly update their state and their submission is handled by a JavaScript function. This function has full access to the data that is entered by the user into a form.
1 2 3 4 5 6 7 8 9 10 11 12 13 14 15 16 17 18 | handleSubmit(event) {
alert('A name was submitted: ' + this.state.value);
event.preventDefault();
}
render() {
return (
<form onSubmit={this.handleSubmit}>
<label>
Name:
<input type="text" value={this.state.value} onChange={this.handleSubmit} />
</label>
<input type="submit" value="Submit" />
</form>
);
}
|
29. What do you know about controlled and uncontrolled components?
Controlled vs Uncontrolled Components
| Controlled Components | Uncontrolled Components |
|---|
| 1. They do not maintain their own state | 1. They maintain their own state |
| 2. Data is controlled by the parent component | 2. Data is controlled by the DOM |
| 3. They take in the current values through props and then notify the changes via callbacks | 3. Refs are used to get their current values |
In case you are facing any challenges with these React interview questions, please comment on your problems in the section below.
React Interview Questions
30. What are Higher-Order Components(HOC)?
Higher-Order Component is an advanced way of reusing the component logic. Basically, it’s a pattern that is derived from React’s compositional nature. HOC are custom components that wrap another component within it. They can accept any dynamically provided child component but they won’t modify or copy any behavior from their input components. You can say that HOC is ‘pure’ components.
31. What can you do with HOC?
HOC can be used for many tasks like:
- Code reuse, logic, and bootstrap abstraction
- Render High jacking
- State abstraction and manipulation
- Props manipulation
32. What are Pure Components?
Pure components are the simplest and fastest components that can be written. They can replace any component which only has a render(). These components enhance the simplicity of the code and the performance of the application.
33. What is the significance of keys in React?
Keys are used for identifying unique Virtual DOM Elements with their corresponding data driving the UI. They help React optimize the rendering by recycling all the existing elements in the DOM. These keys must be a unique number or string, using which React just reorders the elements instead of re-rendering them. This leads to an increase in the application’s performance.
React Redux – React Interview Questions
34. What were the major problems with the MVC framework?
Following are some of the major problems with the MVC framework:
- DOM manipulation was very expensive
- Applications were slow and inefficient
- There was huge memory wastage
- Because of circular dependencies, a complicated model was created around models and views
35. Explain Flux.
Flux is an architectural pattern that enforces the uni-directional data flow. It controls derived data and enables the communication between multiple components using a central Store that has authority for all data. Any update in data throughout the application must occur here only. Flux provides stability to the application and reduces run-time errors.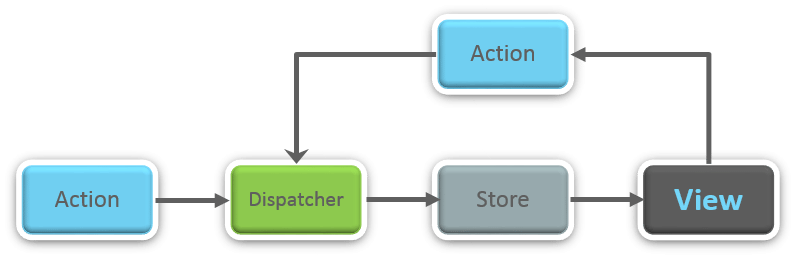
36. What is Redux?
Redux is one of the most trending libraries for front-end development in today’s marketplace. It is a predictable state container for JavaScript applications and is used for the entire applications state management. Applications developed with Redux are easy to test and can run in different environments showing consistent behavior.
37. What are the three principles that Redux follows?
- Single source of truth: The state of the entire application is stored in an object/ state tree within a single store. The single state tree makes it easier to keep track of changes over time and debug or inspect the application.
- The state is read-only: The only way to change the state is to trigger an action. An action is a plain JS object describing the change. Just like the state is the minimal representation of data, the action is the minimal representation of the change to that data.
- Changes are made with pure functions: In order to specify how the state tree is transformed by actions, you need pure functions. Pure functions are those whose return value depends solely on the values of their arguments.
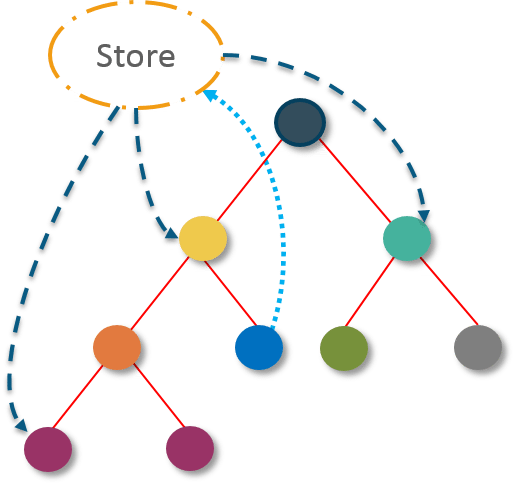
38. What do you understand by “Single source of truth”?
Redux uses ‘Store’ for storing the application’s entire state in one place. So all the component’s states are stored in the Store and they receive updates from the Store itself. The single state tree makes it easier to keep track of changes over time and debug or inspect the application.
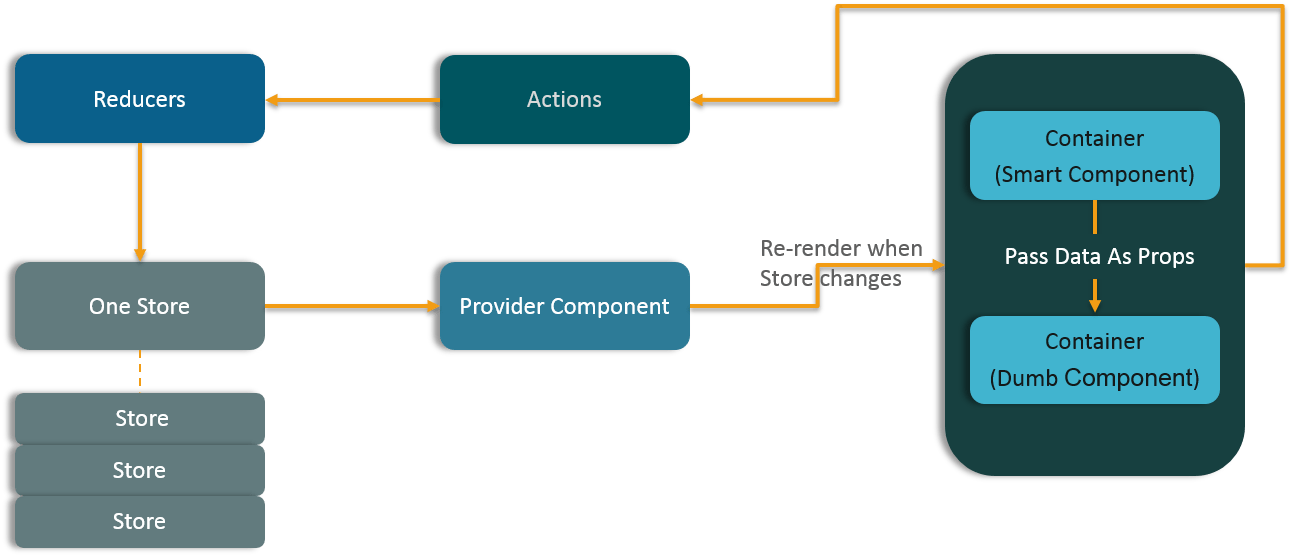
39. List down the components of Redux.
Redux is composed of the following components:
- Action – It’s an object that describes what happened.
- Reducer – It is a place to determine how the state will change.
- Store – State/ Object tree of the entire application is saved in the Store.
- View – Simply displays the data provided by the Store.
In case you are facing any challenges with these React interview questions, please comment on your problems in the section below.
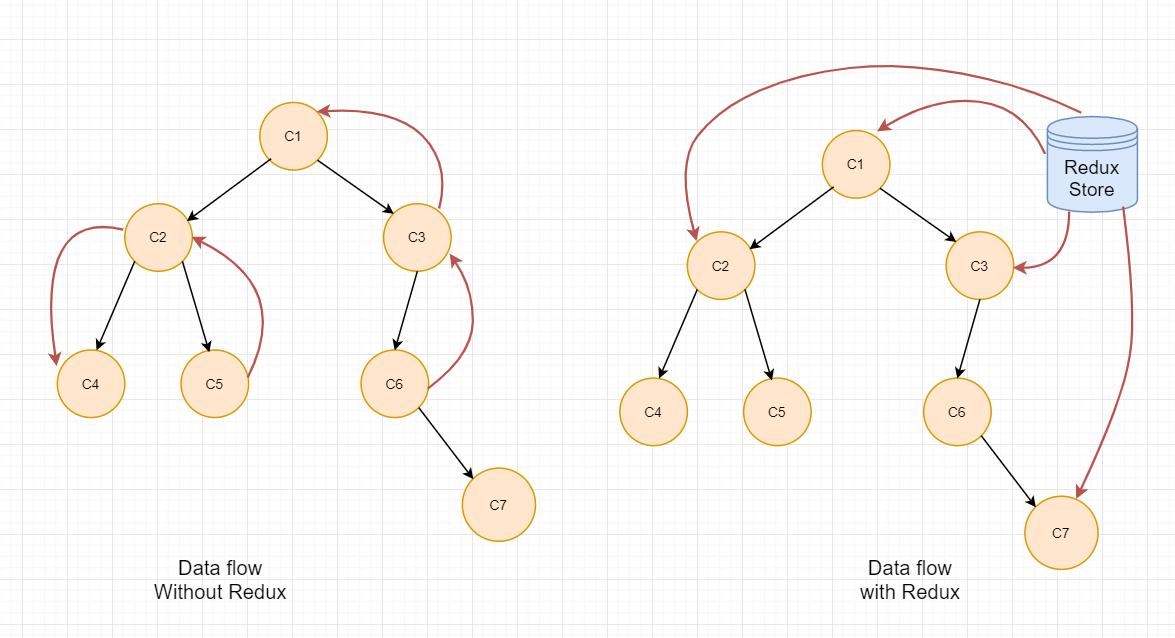
40. Show how the data flows through Redux?
41. How are Actions defined in Redux?
Actions in React must have a type property that indicates the type of ACTION being performed. They must be defined as a String constant and you can add more properties to it as well. In Redux, actions are created using the functions called Action Creators. Below is an example of Action and Action Creator:
1 2 3 4 5 6 | function addTodo(text) {
return {
type: ADD_TODO,
text
}
}
|
42. Explain the role of the Reducer.
Reducers are pure functions that specify how the application’s state changes in response to an ACTION. Reducers work by taking in the previous state and action, and then it returns a new state. It determines what sort of update needs to be done based on the type of the action, and then returns new values. It returns the previous state as it is, if no work needs to be done.
43. What is the significance of Store in Redux?
A store is a JavaScript object which can hold the application’s state and provide a few helper methods to access the state, dispatch actions, and register listeners. The entire state/ object tree of an application is saved in a single store. As a result of this, Redux is very simple and predictable. We can pass middleware to the store to handle the processing of data as well as to keep a log of various actions that change the state of stores. All the actions return a new state via reducers.
44. How is Redux different from Flux?
Flux vs Redux
| Flux | Redux |
|---|
| 1. The Store contains state and change logic | 1. Store and change logic are separate |
| 2. There are multiple stores | 2. There is only one store |
| 3. All the stores are disconnected and flat | 3. Single store with hierarchical reducers |
| 4. Has singleton dispatcher | 4. No concept of the dispatcher |
| 5. React components subscribe to the store | 5. Container components utilize connect |
| 6. State is mutable | 6. State is immutable |
In case you are facing any challenges with these React interview questions, please comment on your problems in the section below.
React Interview Questions
45. What are the advantages of Redux?
Advantages of Redux are listed below:
- Predictability of outcome – Since there is always one source of truth, i.e. the store, there is no confusion about how to sync the current state with actions and other parts of the application.
- Maintainability – The code becomes easier to maintain with a predictable outcome and strict structure.
- Server-side rendering – You just need to pass the store created on the server, to the client-side. This is very useful for initial render and provides a better user experience as it optimizes the application performance.
- Developer tools – From actions to state changes, developers can track everything going on in the application in real-time.
- Community and ecosystem – Redux has a huge community behind it which makes it even more captivating to use. A large community of talented individuals contribute to the betterment of the library and develop various applications with it.
- Ease of testing – Redux’s code is mostly functions that are small, pure, and isolated. This makes the code testable and independent.
- Organization – Redux is precise about how code should be organized, this makes the code more consistent and easier when a team works with it.
React Router – React Interview Questions
46. What is React Router?
React Router is a powerful routing library built on top of React, which helps in adding new screens and flows to the application. This keeps the URL in sync with the data that’s being displayed on the web page. It maintains a standardized structure and behavior and is used for developing single-page web applications. React Router has a simple API.
47. Why is the switch keyword used in React Router v4?
Although a <div> is used to encapsulate multiple routes inside the Router. The ‘switch’ keyword is used when you want to display only a single route to be rendered amongst the several defined routes. The <switch> tag when in use matches the typed URL with the defined routes in sequential order. When the first match is found, it renders the specified route. Thereby bypassing the remaining routes.
48. Why do we need a Router in React?
A Router is used to define multiple routes and when a user types a specific URL, if this URL matches the path of any ‘route’ defined inside the router, then the user is redirected to that particular route. So basically, we need to add a Router library to our app that allows creating multiple routes with each leading to us a unique view.
1 2 3 4 5 | <switch>
<route exact path=’/’ component={Home}/>
<route path=’/posts/:id’ component={Newpost}/>
<route path=’/posts’ component={Post}/>
</switch>
|
49. List down the advantages of React Router.
Few advantages are: Just like how React is based on components, in React Router v4, the API is ‘All About Components’. A Router can be visualized as a single root component (<BrowserRouter>) in which we enclose the specific child routes (<route>).
- No need to manually set History value: In React Router v4, all we need to do is wrap our routes within the <BrowserRouter> component.
- The packages are split: Three packages one each for Web, Native, and Core. This supports the compact size of our application. It is easy to switch over based on a similar coding style.
50. How is React Router different from conventional routing?
Conventional Routing vs React Routing
| Topic | Conventional Routing | React Routing |
| PAGES INVOLVED | Each view corresponds to a new file | The only single HTML page is involved |
| URL CHANGES | An HTTP request is sent to a server and a corresponding HTML page is received | Only the History attribute is changed |
| FEEL | User actually navigates across different pages for each view | The user is duped thinking he is navigating across different pages |
I hope this set of React Interview Questions and Answers will help you in preparing for your interviews. All the best!
What are the advantages of using React?
MVC is generally abbreviated as Model View Controller.
- Use of Virtual DOM to improve efficiency
React uses virtual DOM to render the view. As the name suggests, virtual DOM is a virtual representation of the real DOM. Each time the data changes in a react app, a new virtual DOM gets created. Creating a virtual DOM is much faster than rendering the UI inside the browser. Therefore, with the use of virtual DOM, the efficiency of the app improves. - Gentle learning curve
React has a gentle learning curve when compared to frameworks like Angular. Anyone with little knowledge of javascript can start building web applications using React. - SEO friendly
React allows developers to develop engaging user interfaces that can be easily navigated in various search engines. It also allows server-side rendering, which boosts the SEO of an app. - Reusable components
React uses component-based architecture for developing applications. Components are independent and reusable bits of code. These components can be shared across various applications having similar functionality. The re-use of components increases the pace of development. - Huge ecosystem of libraries to choose from
React provides you the freedom to choose the tools, libraries, and architecture for developing an application based on your requirement.
2. What is JSX?
JSX stands for JavaScript XML.
It allows us to write HTML inside JavaScript and place them in the DOM without using functions like appendChild( ) or createElement( ).
As stated in the official docs of React, JSX provides syntactic sugar for React.createElement( ) function.
**Note- We can create react applications without using JSX as well.Let’s understand how JSX works:
Without using JSX, we would have to create an element by the following process:
const text = React.createElement('p', {}, 'This is a text');
const container = React.createElement('div','{}',text );
ReactDOM.render(container,rootElement);
the above code can be simplified:
const container = (
 <div>
   <p>This is a text</p>
 </div>
);
ReactDOM.render(container,rootElement);
As one can see in the code above, we are directly using HTML inside JavaScript.
3. What are the differences between functional and class components?
Before the introduction of Hooks in React, functional components were called stateless components and were behind class components on a feature basis. After the introduction of Hooks, functional components are equivalent to class components.
Although functional components are the new trend, the react team insists on keeping class components in React. Therefore, it is important to know how these components differ.
On the following basis let’s compare functional and class components:
- Declaration
Functional components are nothing but JavaScript functions and therefore can be declared using an arrow function or the function keyword:
function card(props){
 return(
   <div className="main-container">
     <h2>Title of the card</h2>
   </div>
 )
}

const card = (props) =>{
 return(
   <div className="main-container">
     <h2>Title of the card</h2>
   </div>
 )
}
Class components on the other hand, are declared using the ES6 class:class Card extends React.Component{
constructor(props){
super(props);
}
render(){
return(
<div className="main-container">
<h2>Title of the card</h2>
</div>
)
}
}
- Handling props
Let’s render the following component with props and analyze how functional and class components handle props:
<StudentInfo name="Brnfullstack" rollNumber="23" />
In functional components, the handling of props is pretty straightforward. Any prop provided as an argument to a functional component can be directly used inside HTML elements:
function StudentInfo(props){
 return(
   <div className="main">
     <h2>{props.name}</h2>
     <h4>{props.rollNumber}</h4>
   </div>
 )
}
In the case of class components, props are handled in a different way:
class StudentInfo extends React.Component{
 constructor(props){
   super(props);
 }

 render(){
   return(
     <div className="main">
       <h2>{this.props.name}</h2>
       <h4>{this.props.rollNumber}</h4>
     </div>
   )
 }
}
- Handling state
Functional components use React hooks to handle state.
It uses the useState hook to set the state of a variable inside the component:
function ClassRoom(props){
 let [studentsCount,setStudentsCount] = useState(0);

 const addStudent = () => {
   setStudentsCount(++studentsCount);
 }
 return(
   <div>
     <p>Number of students in class room: {studentsCount}</p>
     <button onClick={addStudent}>Add Student</button>
   </div>
 )
}
Since the useState hook returns an array of two items, the first item contains the current state, and the second item is a function used to update the state.
In the code above, using array destructuring we have set the variable name to students count with a current value of “0” and setStudentsCount is the function that is used to update the state.
For reading the state, we can see from the code above, the variable name can be directly used to read the current state of the variable.
We cannot use React Hooks inside class components, therefore state handling is done very differently in a class component:
Let’s take the same above example and convert it into a class component:
class ClassRoom extends React.Component{
          constructor(props){
            super(props);
            this.state = {studentsCount : 0};

            this.addStudent = this.addStudent.bind(this);
          }

          addStudent(){
            this.setState((prevState)=>{
              return {studentsCount: prevState.studentsCount++}
            });
          }

          render(){
            return(
              <div>
                <p>Number of students in class room: {this.state.studentsCount}</p>
                <button onClick={this.addStudent}>Add Student</button>
              </div>
            )
          }
         }
In the code above, we see we are using this.state to add the variable studentsCount and setting the value to “0”.
For reading the state, we are using this.state.studentsCount.
For updating the state, we need to first bind the addStudent function to this. Only then, we will be able to use the setState function which is used to update the state.
4. What is Virtual DOM? How does react use the virtual DOM to render the UI?
As stated by the react team, virtual DOM is a concept where a virtual representation of the real DOM is kept inside the memory and is synced with the real DOM by a library such as ReactDOM.
 Why was virtual DOM introduced?
 DOM manipulation is an integral part of any web application, but DOM manipulation is quite slow when compared to other operations in JavaScript.
The efficiency of the application gets affected when several DOM manipulations are being done. Most JavaScript frameworks update the entire DOM even when a small part of the DOM changes.
For example, consider a list that is being rendered inside the DOM. If one of the items in the list changes, the entire list gets rendered again instead of just rendering the item that was changed/updated. This is called inefficient updating.
To address the problem of inefficient updating, the react team introduced the concept of virtual DOM.
How does it work?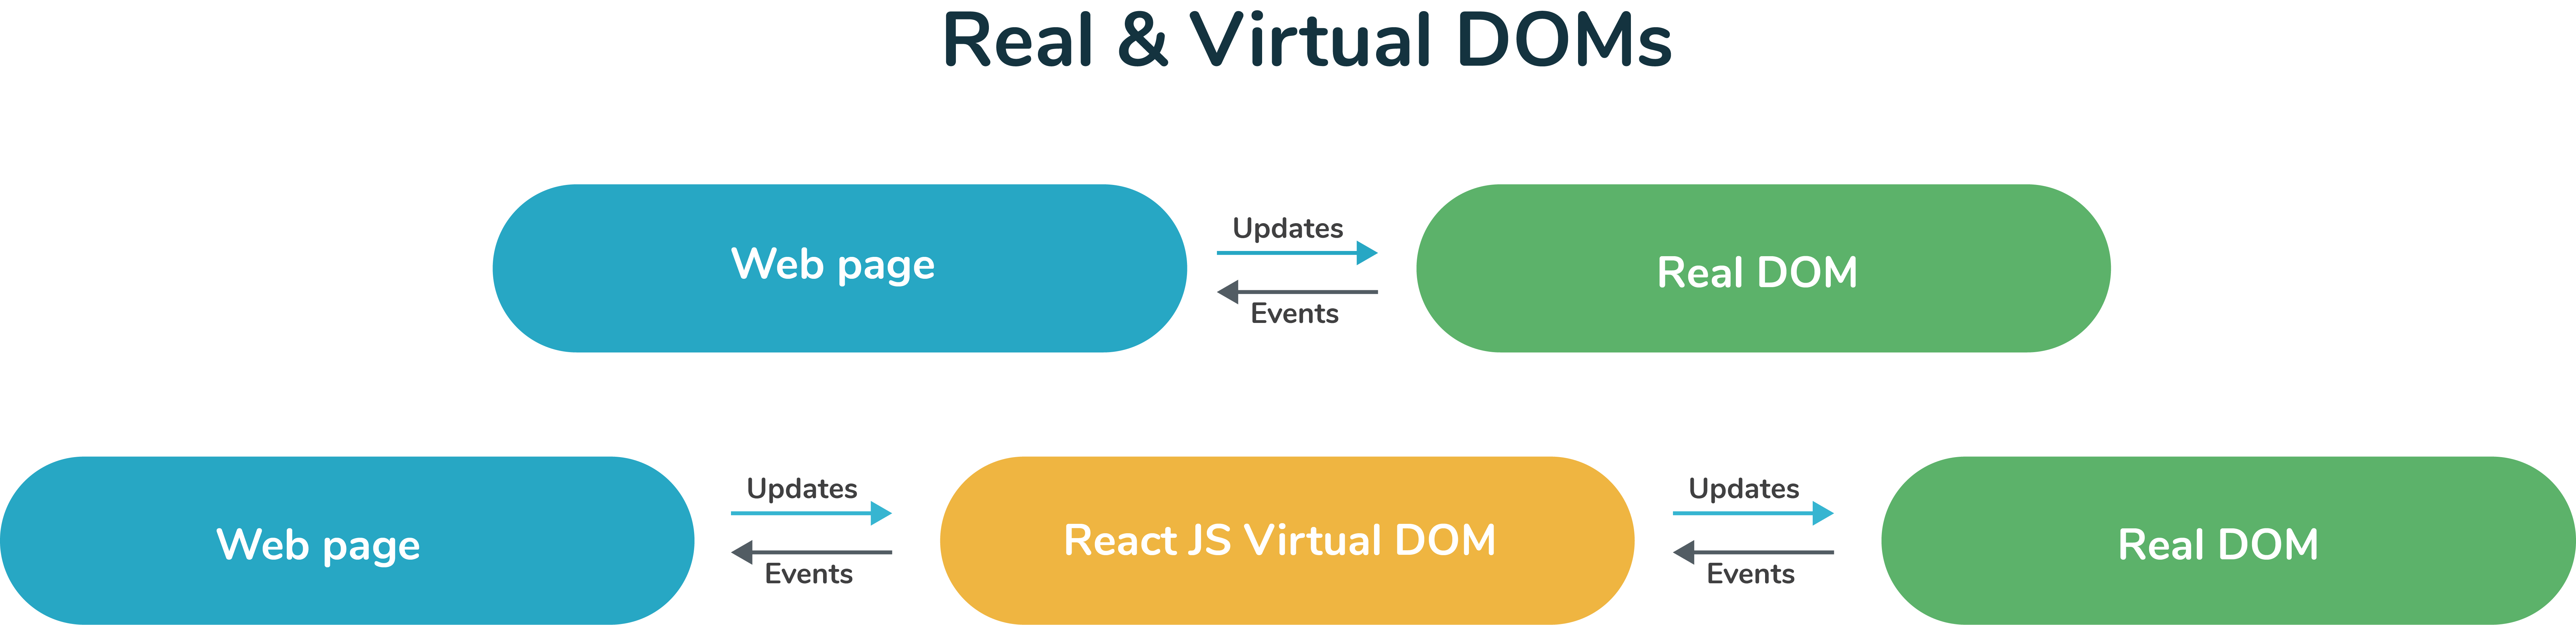
For every DOM object, there is a corresponding virtual DOM object(copy), which has the same properties.
The main difference between the real DOM object and the virtual DOM object is that any changes in the virtual DOM object will not reflect on the screen directly. Consider a virtual DOM object as a blueprint of the real DOM object.
Whenever a JSX element gets rendered, every virtual DOM object gets updated.
**Note- One may think updating every virtual DOM object might be inefficient, but that’s not the case. Updating the virtual DOM is much faster than updating the real DOM since we are just updating the blueprint of the real DOM.React uses two virtual DOMs to render the user interface. One of them is used to store the current state of the objects and the other to store the previous state of the objects.
Whenever the virtual DOM gets updated, react compares the two virtual DOMs and gets to know about which virtual DOM objects were updated.
After knowing which objects were updated, react renders only those objects inside the real DOM instead of rendering the complete real DOM.
This way, with the use of virtual DOM, react solves the problem of inefficient updating.
5. What are the differences between controlled and uncontrolled components?
Controlled and uncontrolled components are just different approaches to handling input form elements in react.
| Feature | Uncontrolled | Controlled | Name attrs |
|---|
| One-time value retrieval (e.g. on submit) | ✔️ | ✔️ | ✔️ |
| Validating on submit | ✔️ | ✔️ | ✔️ |
| Field-level Validation | ❌ | ✔️ | ✔️ |
| Conditionally disabling submit button | ❌ | ✔️ | ✔️ |
| Enforcing input format | ❌ | ✔️ | ✔️ |
| several inputs for one piece of data | ❌ | ✔️ | ✔️ |
| dynamic inputs | ❌ | ✔️ | 🤔 |
Controlled component In a controlled component, the value of the input element is controlled by React.
We store the state of the input element inside the code, and by using event-based callbacks, any changes made to the input element will be reflected in the code as well.
When a user enters data inside the input element of a controlled component, the onChange function gets triggered and inside the code, we check whether the value entered is valid or invalid. If the value is valid, we change the state and re-render the input element with the new value.
Example of a controlled component:
function FormValidation(props) {
 let [inputValue, setInputValue] = useState("");

 let updateInput = e => {
   setInputValue(e.target.value);
 };

 return (
   <div>
     <form>
       <input type="text" value={inputValue} onChange={updateInput} />
     </form>
   </div>
 );
}
As one can see in the code above, the value of the input element is determined by the state of the
inputValue variable. Any changes made to the input element are handled by the
updateInput function.
Uncontrolled component In an uncontrolled component, the value of the input element is handled by the DOM itself.
Input elements inside uncontrolled components work just like normal HTML input form elements.
The state of the input element is handled by the DOM. Whenever the value of the input element is changed, event-based callbacks are not called. Basically, react does not perform any action when there are changes made to the input element.
Whenever use enters data inside the input field, the updated data is shown directly. To access the value of the input element, we can use
ref.
Example of an uncontrolled component:
function FormValidation(props) {
 let inputValue = React.createRef();

 let handleSubmit = e => {
   alert(`Input value: ${inputValue.current.value}`);
   e.preventDefault();
 };

 return (
   <div>
     <form onSubmit={handleSubmit}>
       <input type="text" ref={inputValue} />
       <button type="submit">Submit</button>
     </form>
   </div>
 );
}
As one can see in the code above, we are
not using the
onChange function to govern the changes made to the input element. Instead, we are using
ref to access the value of the input element.
6. What are the different lifecycle methods in React?
Every component in React has lifecycle methods that we can tap into, to trigger changes at a particular phase of the life cycle.
Each component in react goes through three phases:
Mounting,
Updating and
Unmounting.
There are corresponding lifecycle methods for each of the three phases:
**Note- In this article, we are discussing the use of lifecycle methods in class components. For utilising lifecycle methods in functional components, react hooks are used.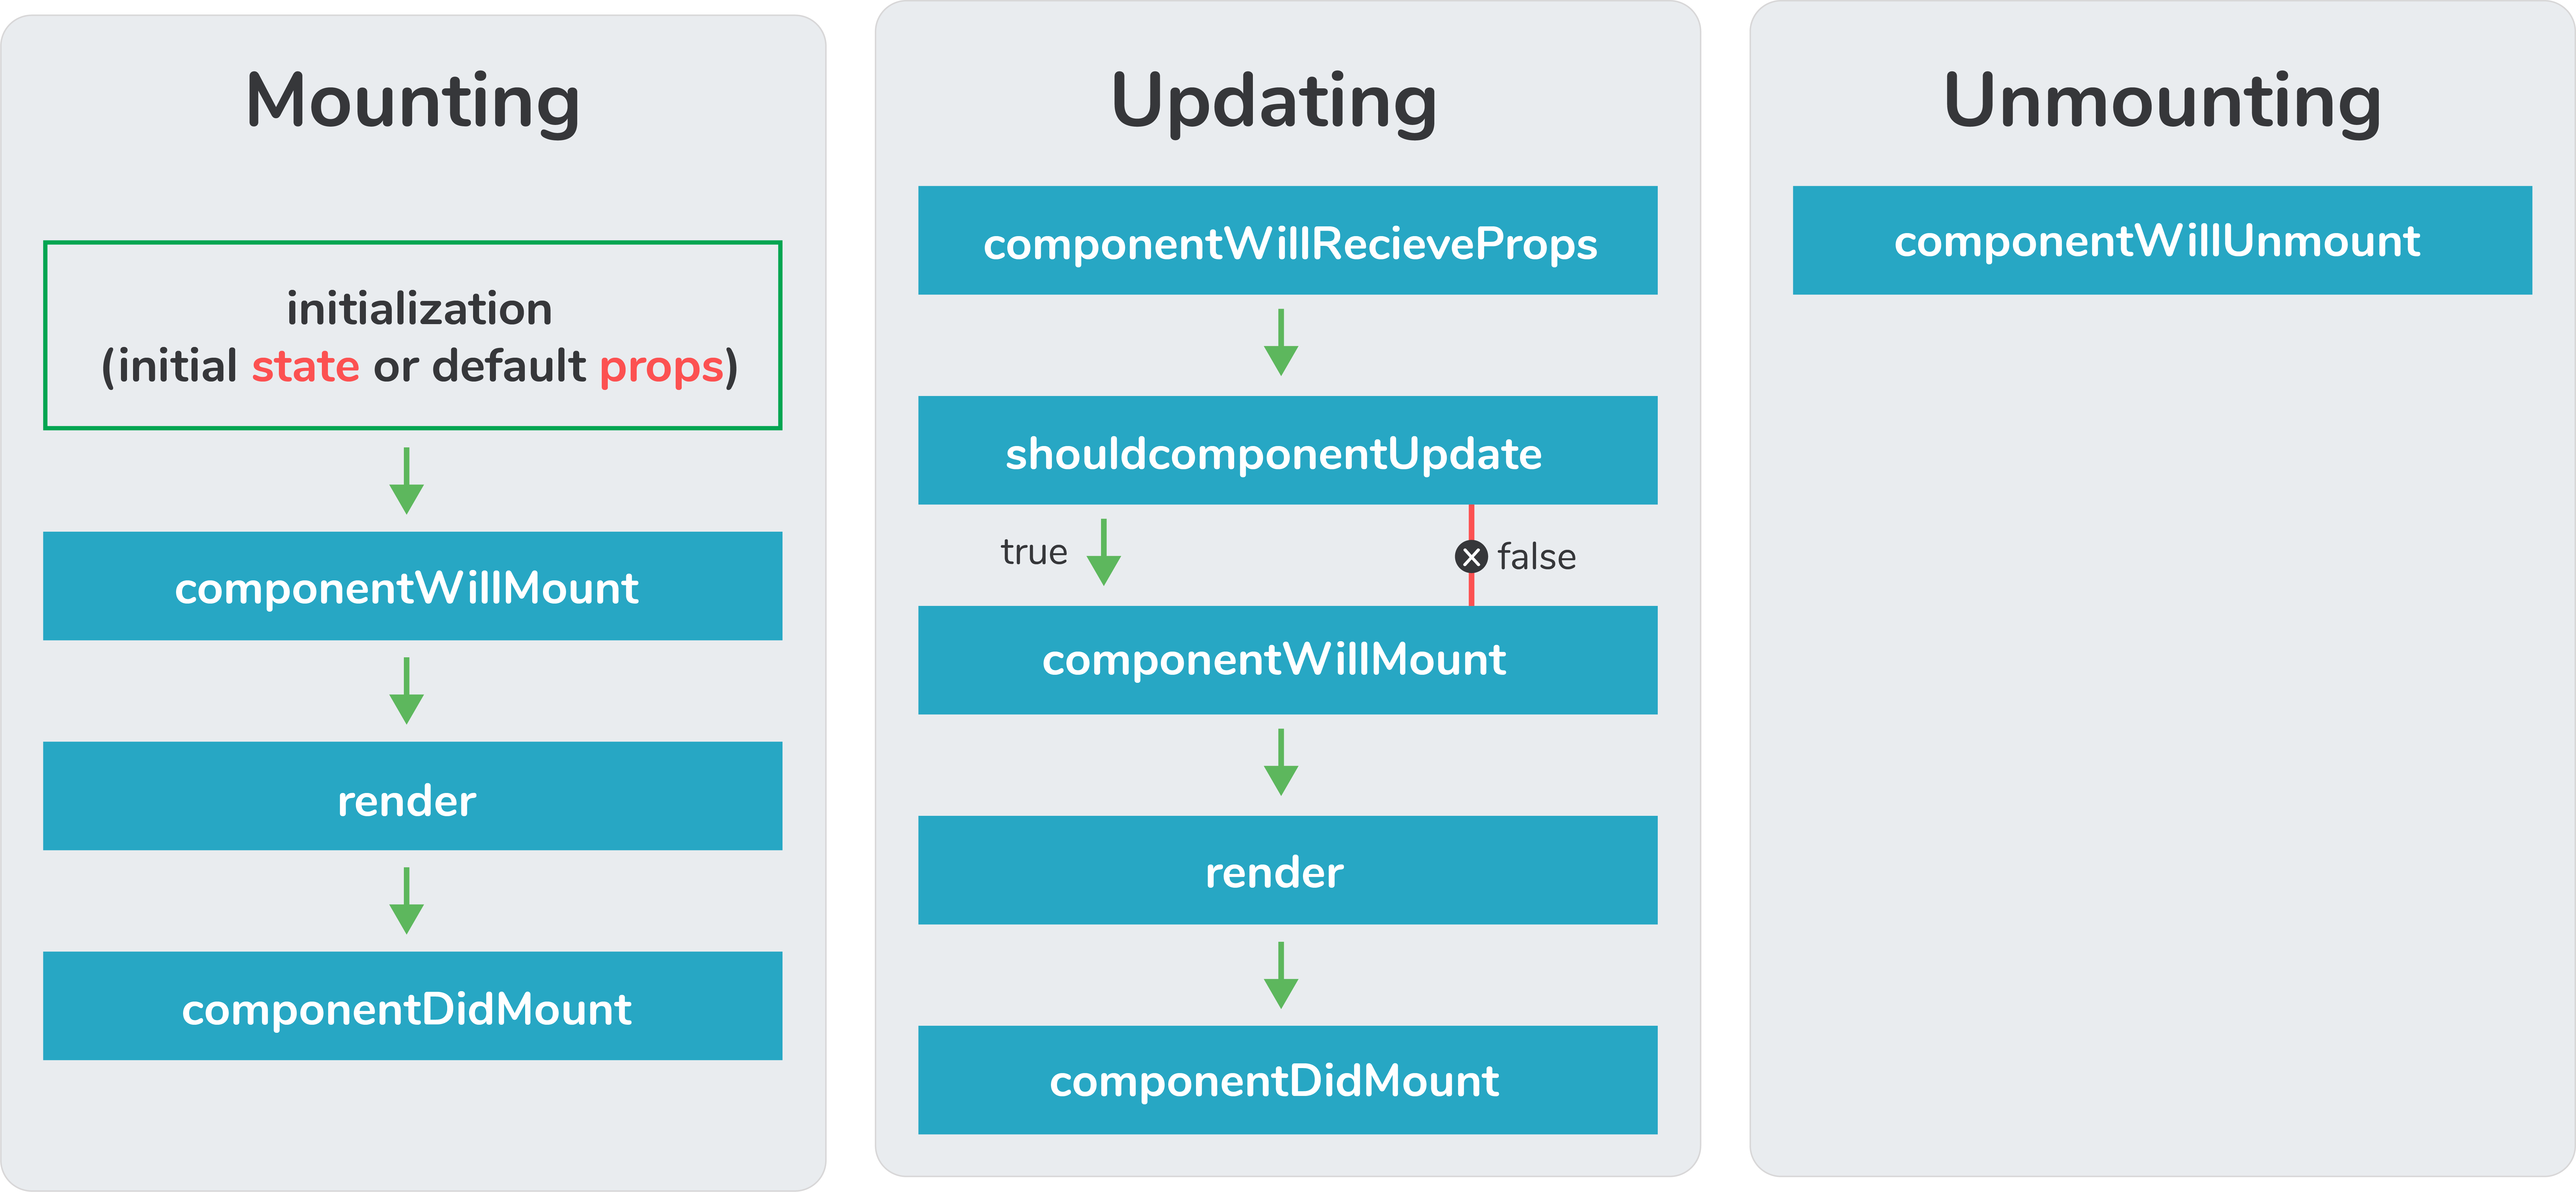
Mounting:
There are four built-in lifecycle methods that are called in the
following order when a component is mounted:
constructor( ) - This is called before anything else. We can set the initial state of the component inside this method. The constructor method is used to set the initial state and bind methods to the component.
getDerivedStateFromProps( ) - This is called before rendering the elements in the DOM.
In this method, we can set the state of the component based on the props we received. This method is used very rarely.
render( ) - This is the only required method in the class component. This method returns the HTML elements which are going to be rendered inside the DOM.
componentDidMount( ) - It is called right after the component is rendered inside the DOM. All the statements which require the DOM nodes can be executed in this method. Network requests from a remote end-point can also be instantiated in this method.
Updating:
Updates in reactJS are caused by changes in state or props. Update leads to re-rendering of the component. The following methods are called when a component is re-rendered:
getDerivedStateFromProps( ) - This method is called again when a component is being re-rendered.
shouldComponentUpdate( ) - This method is called before rendering the component when new props are received. It lets React know if the component’s output is affected by the newly received props or by the state change. By default, it returns
true.
render( ) - To re-render the HTML inside the DOM, the render( ) method gets called again.
getSnapshotBeforeUpdate( ) - This method is called just before the newly rendered HTML gets committed to the DOM. It stores the previous state of the component so that React has an idea of what parts of the DOM need to be updated.
componentDidUpdate( ) - It is called after the component gets re-rendered. This method works just like the componentDidMount( ) method, the difference is that this method does not get called on initial render.
Unmounting:
componentWillUnmount( ) - This method is called just before the component gets destroyed. Any clean-up statements should be executed inside this method.
7. Explain Strict Mode in React.
StrictMode is a tool added in
version 16.3 of React to highlight potential problems in an application. It performs additional checks on the application.
function App() {
  return (
    <React.StrictMode>
      <div classname="App">
        <Header/>
        <div>
          Page Content
        </div>
        <Footer/>
      </div>
    </React.StrictMode>
  );
}
To enable StrictMode,
<React.StrictMode> tags need to be added inside the application:
import React from "react";
import ReactDOM from "react-dom";

import App from "./App";

const rootElement = document.getElementById("root");
ReactDOM.render(
 <React.StrictMode>
   <App />
 </React.StrictMode>,
 rootElement
);
StrictMode currently helps with the following issues:
- Identifying components with unsafe lifecycle methods
Certain lifecycle methods are unsafe to use in asynchronous react applications. With the use of third-party libraries, it becomes difficult to ensure that certain lifecycle methods are not used.
StrictMode helps in providing us a warning if any of the class components use an unsafe lifecycle method.
- Warning about the usage of legacy string API
If one is using an older version of React, callback ref is the recommended way to manage refs instead of using the string refs. StrictMode gives a warning if we are using string refs to manage refs.
- Warning about the usage of findDOMNode
Previously, findDOMNode( ) method was used to search the tree of a DOM node. This method is deprecated in React. Hence, the StrictMode gives us a warning about the usage of this method. - Warning about the usage of legacy context API (because the API is error-prone)
8. How to prevent re-renders in React?
Reason for re-renders in React:Re-rendering of a component and its child components occur when props or state of the component has been changed.
Re-rendering components that are not updated, affects the performance of an application.
How to prevent re-rendering:Consider the following components:
class Parent extends React.Component {
 state = { messageDisplayed: false };
 componentDidMount() {
   this.setState({ messageDisplayed: true });
 }

 render() {
   console.log("Parent is getting rendered");
   return (
     <div className="App">
       <Message />
     </div>
   );
 }
}

class Message extends React.Component {
 constructor(props) {
   super(props);
   this.state = { message: "Hello, this is Brnfullstack" };
 }
 render() {
   console.log("Message is getting rendered");
   return (
     <div>
       <p>{this.state.message}</p>
     </div>
   );
 }
}
component is the parent component and the
Message is the child component. Any change in the parent component will lead to re-rendering of the child component as well.
To prevent the re-rendering of child component, we use the shouldComponentUpdate( ) method:
**Note- Use shouldComponentUpdate( ) method only when you are sure that it’s a static component.class Message extends React.Component {
constructor(props) {
super(props);
this.state = { message: "Hello, this is Brnfullstack" };
}
shouldComponentUpdate() {
console.log("Does not get rendered");
return false;
}
render() {
console.log("Message is getting rendered");
return (
<div>
<p>{this.state.message}</p>
</div>
);
}
}
As one can see in the code above, we have returned
false from the shouldComponentUpdate( ) method, which prevents the child component from re-rendering.
9. Explain React state and props.
| Props | State |
|---|
| Immutable | Owned by its component |
| Has better performance | Locally scoped |
| Can be passed to child components | Witeable/Mutable |
| has setState() method to modify properties |
| Changes to state can be asynchronous |
| can only be passed as props |
React StateEvery component in react has a built-in
state object, which contains all the property values that belong to that component.
In other words,
the state object controls the behavior of a component. Any change in the property values of the state object leads to the re-rendering of the component.
**Note- State object is not available in functional components but, we can use React Hooks to add state to a functional component.How to declare a state object?Example:
class Car extends React.Component{
 constructor(props){
   super(props);
   this.state = {
     brand: "BMW",
     color: "black"
   }
 }
}
class Car extends React.Component {
 constructor(props) {
   super(props);
   this.state = {
     brand: "BMW",
     color: "Black"
   };
 }

 changeColor() {
   this.setState(prevState => {
     return { color: "Red" };
   });
 }

 render() {
   return (
     <div>
       <button onClick={() => this.changeColor()}>Change Color</button>
       <p>{this.state.color}</p>
     </div>
   );
 }
}
As one can see in the code above, we can use the state by calling
this.state.propertyName and we can change the state object property using the
setState method.
React PropsEvery react component, accepts a single object argument called
props (which stands for “properties”).
These props can be passed to a component using HTML attributes and the component accepts these props as an argument.
Using props, we can pass data from one component to another.
Passing props to a component:
While rendering a component, we can pass the props as an HTML attribute:
The component receives the props:
In Class component:
class Car extends React.Component {
 constructor(props) {
   super(props);
   this.state = {
     brand: this.props.brand,
     color: "Black"
   };
 }
}
In Functional component:
function Car(props) {
 let [brand, setBrand] = useState(props.brand);
}
10. Explain React Hooks.
What are Hooks? Hooks are functions that let us “hook into” React state and lifecycle features from
a functional component.
React Hooks
cannot be used in class components. They let us write components without class.
Why were Hooks introduced in React?React hooks were introduced in the 16.8 version of React.
Previously, functional components were called stateless components. Only class components were used for state management and lifecycle methods.
The need to change a functional component to a class component, whenever state management or lifecycle methods were to be used, led to the development of Hooks.
Example of a hook:useState hook:In functional components, the useState hook lets us define a state for a component:
function Person(props) {
 // We are declaring a state variable called name.
 // setName is a function to update/change the value of name
 let [name, setName] = useState('');
}
The state variable “name” can be directly used inside the HTML.
11. What are the different ways to style a React component?
There are many different ways through which one can style a React component. Some of the ways are :
- Inline Styling
We can directly style an element using inline style attributes.
Make sure the value of style is a JavaScript object:
class RandomComponent extends React.Component {
 render() {
   return (
     <div>
       <h3 style={{ color: "Yellow" }}>This is a heading</h3>
       <p style={{ fontSize: "32px" }}>This is a paragraph</p>
     </div>
   );
 }
}
- Using JavaScript object
We can create a separate JavaScript object and set the desired style properties.
This object can be used as the value of the inline style attribute.
class RandomComponent extends React.Component {
 paragraphStyles = {
   color: "Red",
   fontSize: "32px"
 };

 headingStyles = {
   color: "blue",
   fontSize: "48px"
 };

 render() {
   return (
     <div>
       <h3 style={this.headingStyles}>This is a heading</h3>
       <p style={this.paragraphStyles}>This is a paragraph</p>
     </div>
   );
 }
}
- CSS Stylesheet
We can create a separate CSS file and write all the styles for the component inside that file. This file needs to be imported inside the component file.
import './RandomComponent.css';

class RandomComponent extends React.Component {
 render() {
   return (
     <div>
       <h3 className="heading">This is a heading</h3>
       <p className="paragraph">This is a paragraph</p>
     </div>
   );
 }
}
- CSS Modules
We can create a separate CSS module and import this module inside our component. Create a file with “.module.css”‘ extension,
styles.module.css:
.paragraph{
 color:"red";
 border:1px solid black;
}
We can import this file inside the component and use it:import styles from './styles.module.css';
class RandomComponent extends React.Component {
render() {
return (
<div>
<h3 className="heading">This is a heading</h3>
<p className={styles.paragraph} >This is a paragraph</p>
</div>
);
}
}
There are many ways through which one can optimize the performance of a React app, let’s have a look at some of them:
- Using useMemo( ) -
It is a React hook that is used for caching CPU-Expensive functions.
Sometimes in a React app, a CPU-Expensive function gets called repeatedly due to re-renders of a component, which can lead to slow rendering.
useMemo( ) hook can be used to cache such functions. By using useMemo( ), the CPU-Expensive function gets called only when it is needed.
- Using React.PureComponent -
It is a base component class that checks the state and props of a component to know whether the component should be updated.
Instead of using the simple React. Component, we can use React.PureComponent to reduce the re-renders of a component unnecessarily.
- Maintaining State Colocation -
This is a process of moving the state as close to where you need it as possible.
Sometimes in React app, we have a lot of unnecessary states inside the parent component which makes the code less readable and harder to maintain. Not to forget, having many states inside a single component leads to unnecessary re-renders for the component.
It is better to shift states which are less valuable to the parent component, to a separate component.
- Lazy Loading -
It is a technique used to reduce the load time of a React app. Lazy loading helps reduce the risk of web app performances to a minimal.
13. What are keys in React?
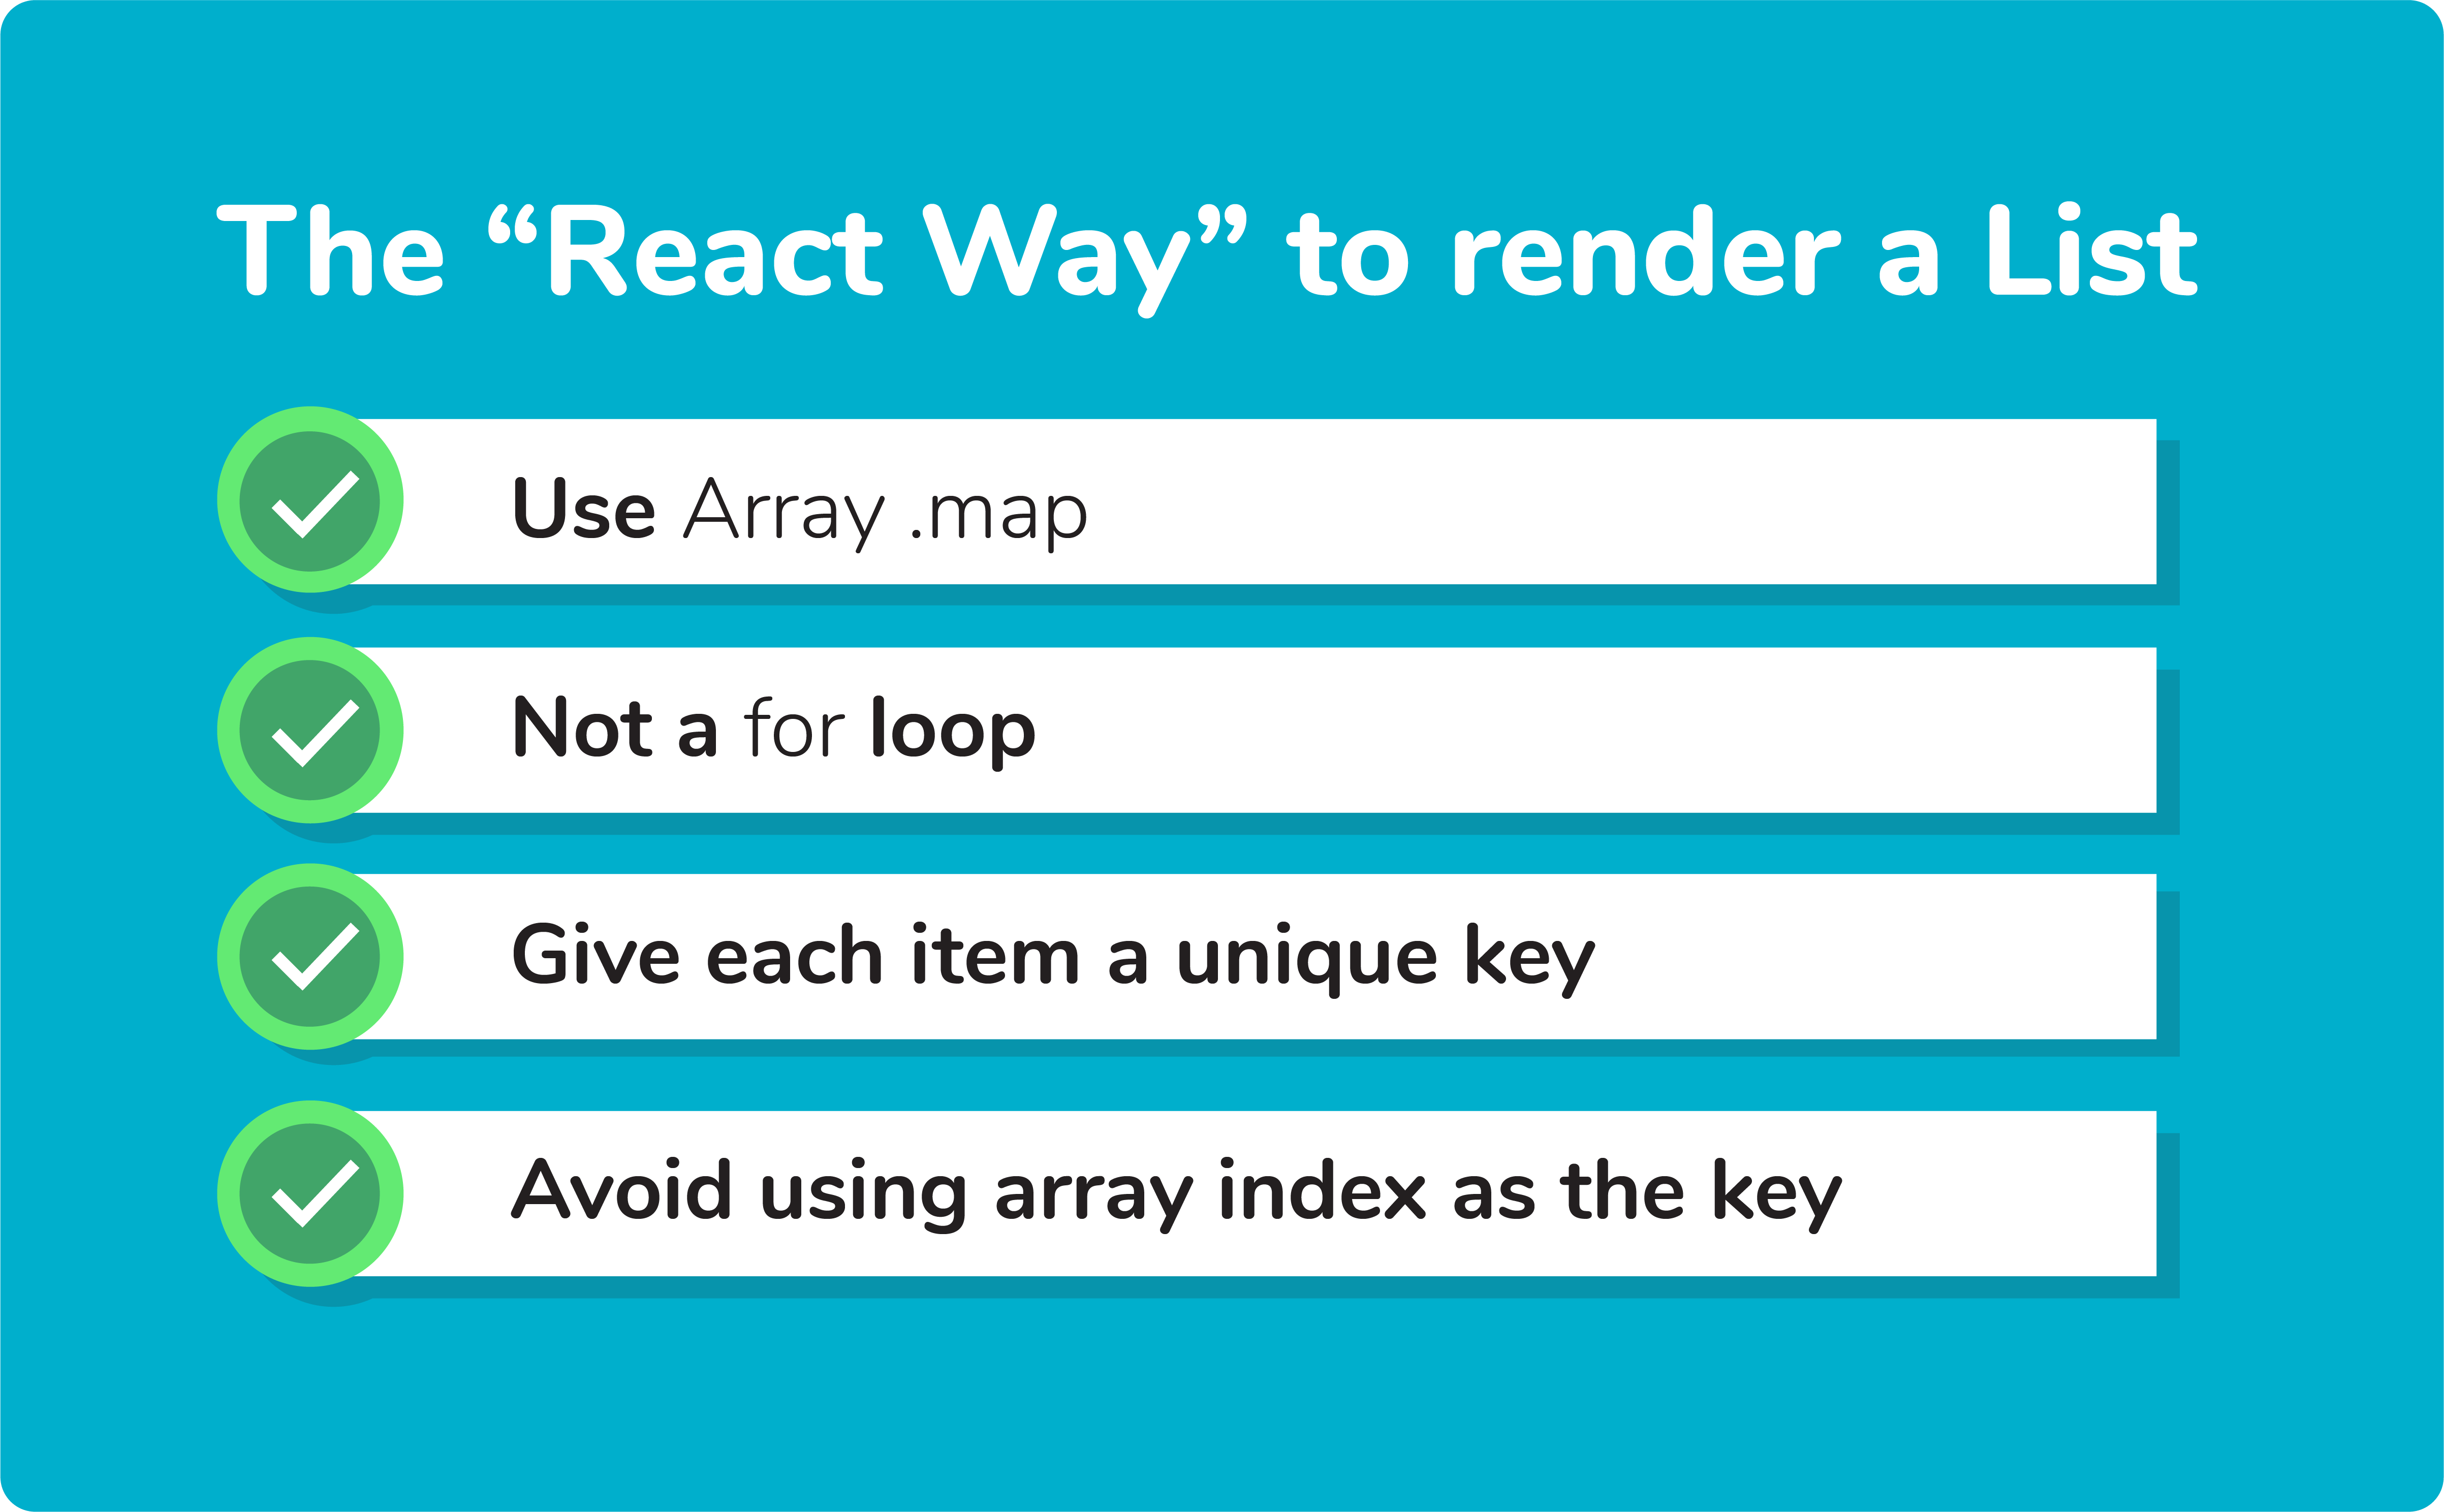
A key is a special string attribute that needs to be included when using lists of elements.
Example of a list using key:
const ids = [1,2,3,4,5];
const listElements = ids.map((id)=>{
 return(
 <li key={id.toString()}>
   {id}
 </li>
 )
})
Keys help react identify which elements were added, changed, or removed.
Keys should be given to array elements for providing a unique identity for each element.
Without keys, React does not understand the order or uniqueness of each element.
With keys, React has an idea of which particular element was deleted, edited, and added.
Keys are generally used for displaying a list of data coming from an API.
***Note- Keys used within arrays should be unique among siblings. They need not be globally unique.14. How to pass data between react components?
 Parent Component to Child Component (using props)
With the help of props, we can send data from a parent to a child component.
How do we do this?
Consider the following Parent Component:
import ChildComponent from "./Child";

    function ParentComponent(props) {
     let [counter, setCounter] = useState(0);

     let increment = () => setCounter(++counter);

     return (
       <div>
         <button onClick={increment}>Increment Counter</button>
         <ChildComponent counterValue={counter} />
       </div>
     );
    }
As one can see in the code above, we are rendering the child component inside the parent component, by providing a prop called counterValue. The value of the counter is being passed from the parent to the child component.
We can use the data passed by the parent component in the following way:
function ChildComponent(props) {
 return (
   <div>
     <p>Value of counter: {props.counterValue}</p>
   </div>
 );
}
We use the
props.counterValue to display the data passed on by the parent component.
Child Component to Parent Component (using callbacks)This one is a bit tricky. We follow the steps below:
- Create a callback in the parent component which takes in the data needed as a parameter.
- Pass this callback as a prop to the child component.
- Send data from the child component using the callback.
We are considering the same example above but in this case, we are going to pass the updated
counterValue from child to parent.
Step1 and Step2: Create a callback in the parent component, pass this callback as a prop.
function ParentComponent(props) {
 let [counter, setCounter] = useState(0);

 let callback = valueFromChild => setCounter(valueFromChild);

 return (
   <div>
     <p>Value of counter: {counter}</p>
     <ChildComponent callbackFunc={callback} counterValue={counter} />
   </div>
 );
}
As one can see in the code above, we created a function called
callback which takes in the data received from the child component as a parameter.
Next, we passed the function
callback as a prop to the child component.
Step3: Pass data from child to the parent component.
function ChildComponent(props) {
 let childCounterValue = props.counterValue;

 return (
   <div>
     <button onClick={() => props.callbackFunc(++childCounterValue)}>
       Increment Counter
     </button>
   </div>
 );
}
In the code above, we have used the
props.counterValue and set it to a variable called
childCounterValue.
Next, on button click, we pass the incremented childCounterValue to the
props.callbackFunc.
This way, we can pass data from the child to the parent component.
15. What are Higher Order Components?
Simply put, Higher-Order Component(HOC) is a function that takes in a component and returns a new component.
 When do we need a Higher Order Component?
While developing React applications, we might develop components that are quite similar to each other with minute differences.
In most cases, developing similar components might not be an issue but, while developing larger applications we need to keep our code
DRY, therefore, we want an
abstraction that allows us to define this logic in a single place and share it across components.
HOC allows us to create that abstraction.
Example of a HOC:
Consider the following components having similar functionality
The following component displays the list of articles:
// "GlobalDataSource" is some global data source
class ArticlesList extends React.Component {
  constructor(props) {
    super(props);
    this.handleChange = this.handleChange.bind(this);
    this.state = {
      articles: GlobalDataSource.getArticles(),
    };
  }

  componentDidMount() {
    // Listens to the changes added
    GlobalDataSource.addChangeListener(this.handleChange);
  }

  componentWillUnmount() {
    // Listens to the changes removed
    GlobalDataSource.removeChangeListener(this.handleChange);
  }

  handleChange() {
    // States gets Update whenver data source changes
    this.setState({
      articles: GlobalDataSource.getArticles(),
    });
  }

  render() {
    return (
      <div>
        {this.state.articles.map((article) => (
          <ArticleData article={article} key={article.id} />
        ))}
      </div>
    );
  }
}
The following component displays the list of users:
// "GlobalDataSource" is some global data source
class UsersList extends React.Component {
  constructor(props) {
    super(props);
    this.handleChange = this.handleChange.bind(this);
    this.state = {
      users: GlobalDataSource.getUsers(),
    };
  }

  componentDidMount() {
    // Listens to the changes added
    GlobalDataSource.addChangeListener(this.handleChange);
  }

  componentWillUnmount() {
    // Listens to the changes removed
    GlobalDataSource.removeChangeListener(this.handleChange);
  }

  handleChange() {
    // States gets Update whenver data source changes
    this.setState({
      users: GlobalDataSource.getUsers(),
    });
  }

  render() {
    return (
      <div>
        {this.state.users.map((user) => (
          <UserData user={user} key={user.id} />
        ))}
      </div>
    );
  }
}
Notice the above components, both have similar functionality but, they are calling different methods to an API endpoint.
Let’s create a Higher Order Component to create an abstraction:
// Higher Order Component which takes a component
// as input and returns another component
// "GlobalDataSource" is some global data source
function HOC(WrappedComponent, selectData) {
  return class extends React.Component {
    constructor(props) {
      super(props);
      this.handleChange = this.handleChange.bind(this);
      this.state = {
        data: selectData(GlobalDataSource, props),
      };
    }

    componentDidMount() {
      // Listens to the changes added
      GlobalDataSource.addChangeListener(this.handleChange);
    }

    componentWillUnmount() {
      // Listens to the changes removed
      GlobalDataSource.removeChangeListener(this.handleChange);
    }

    handleChange() {
      this.setState({
        data: selectData(GlobalDataSource, this.props),
      });
    }

    render() {
      // Rendering the wrapped component with the latest data data
      return <WrappedComponent data={this.state.data} {...this.props} />;
    }
  };
}
We know HOC is a function that takes in a component and returns a component.
In the code above, we have created a function called HOC which returns a component and performs functionality that can be shared across both
ArticlesList component and
UsersList Component.
The second parameter in the HOC function is the function that calls the method on the API endpoint.
We have reduced the duplicated code of the
componentDidUpdate and
componentDidMount functions.
Using the concept of Higher-Order Components, we can now render the
ArticlesList and
UsersList component in the following way:
const ArticlesListWithHOC = HOC(ArticlesList, (GlobalDataSource) => GlobalDataSource.getArticles());
const UsersListWithHOC = HOC(UsersList, (GlobalDataSource) => GlobalDataSource.getUsers());
Remember, we are not trying to change the functionality of each component, we are trying to share a single functionality across multiple components using HOC.
16. What is prop drilling in React?
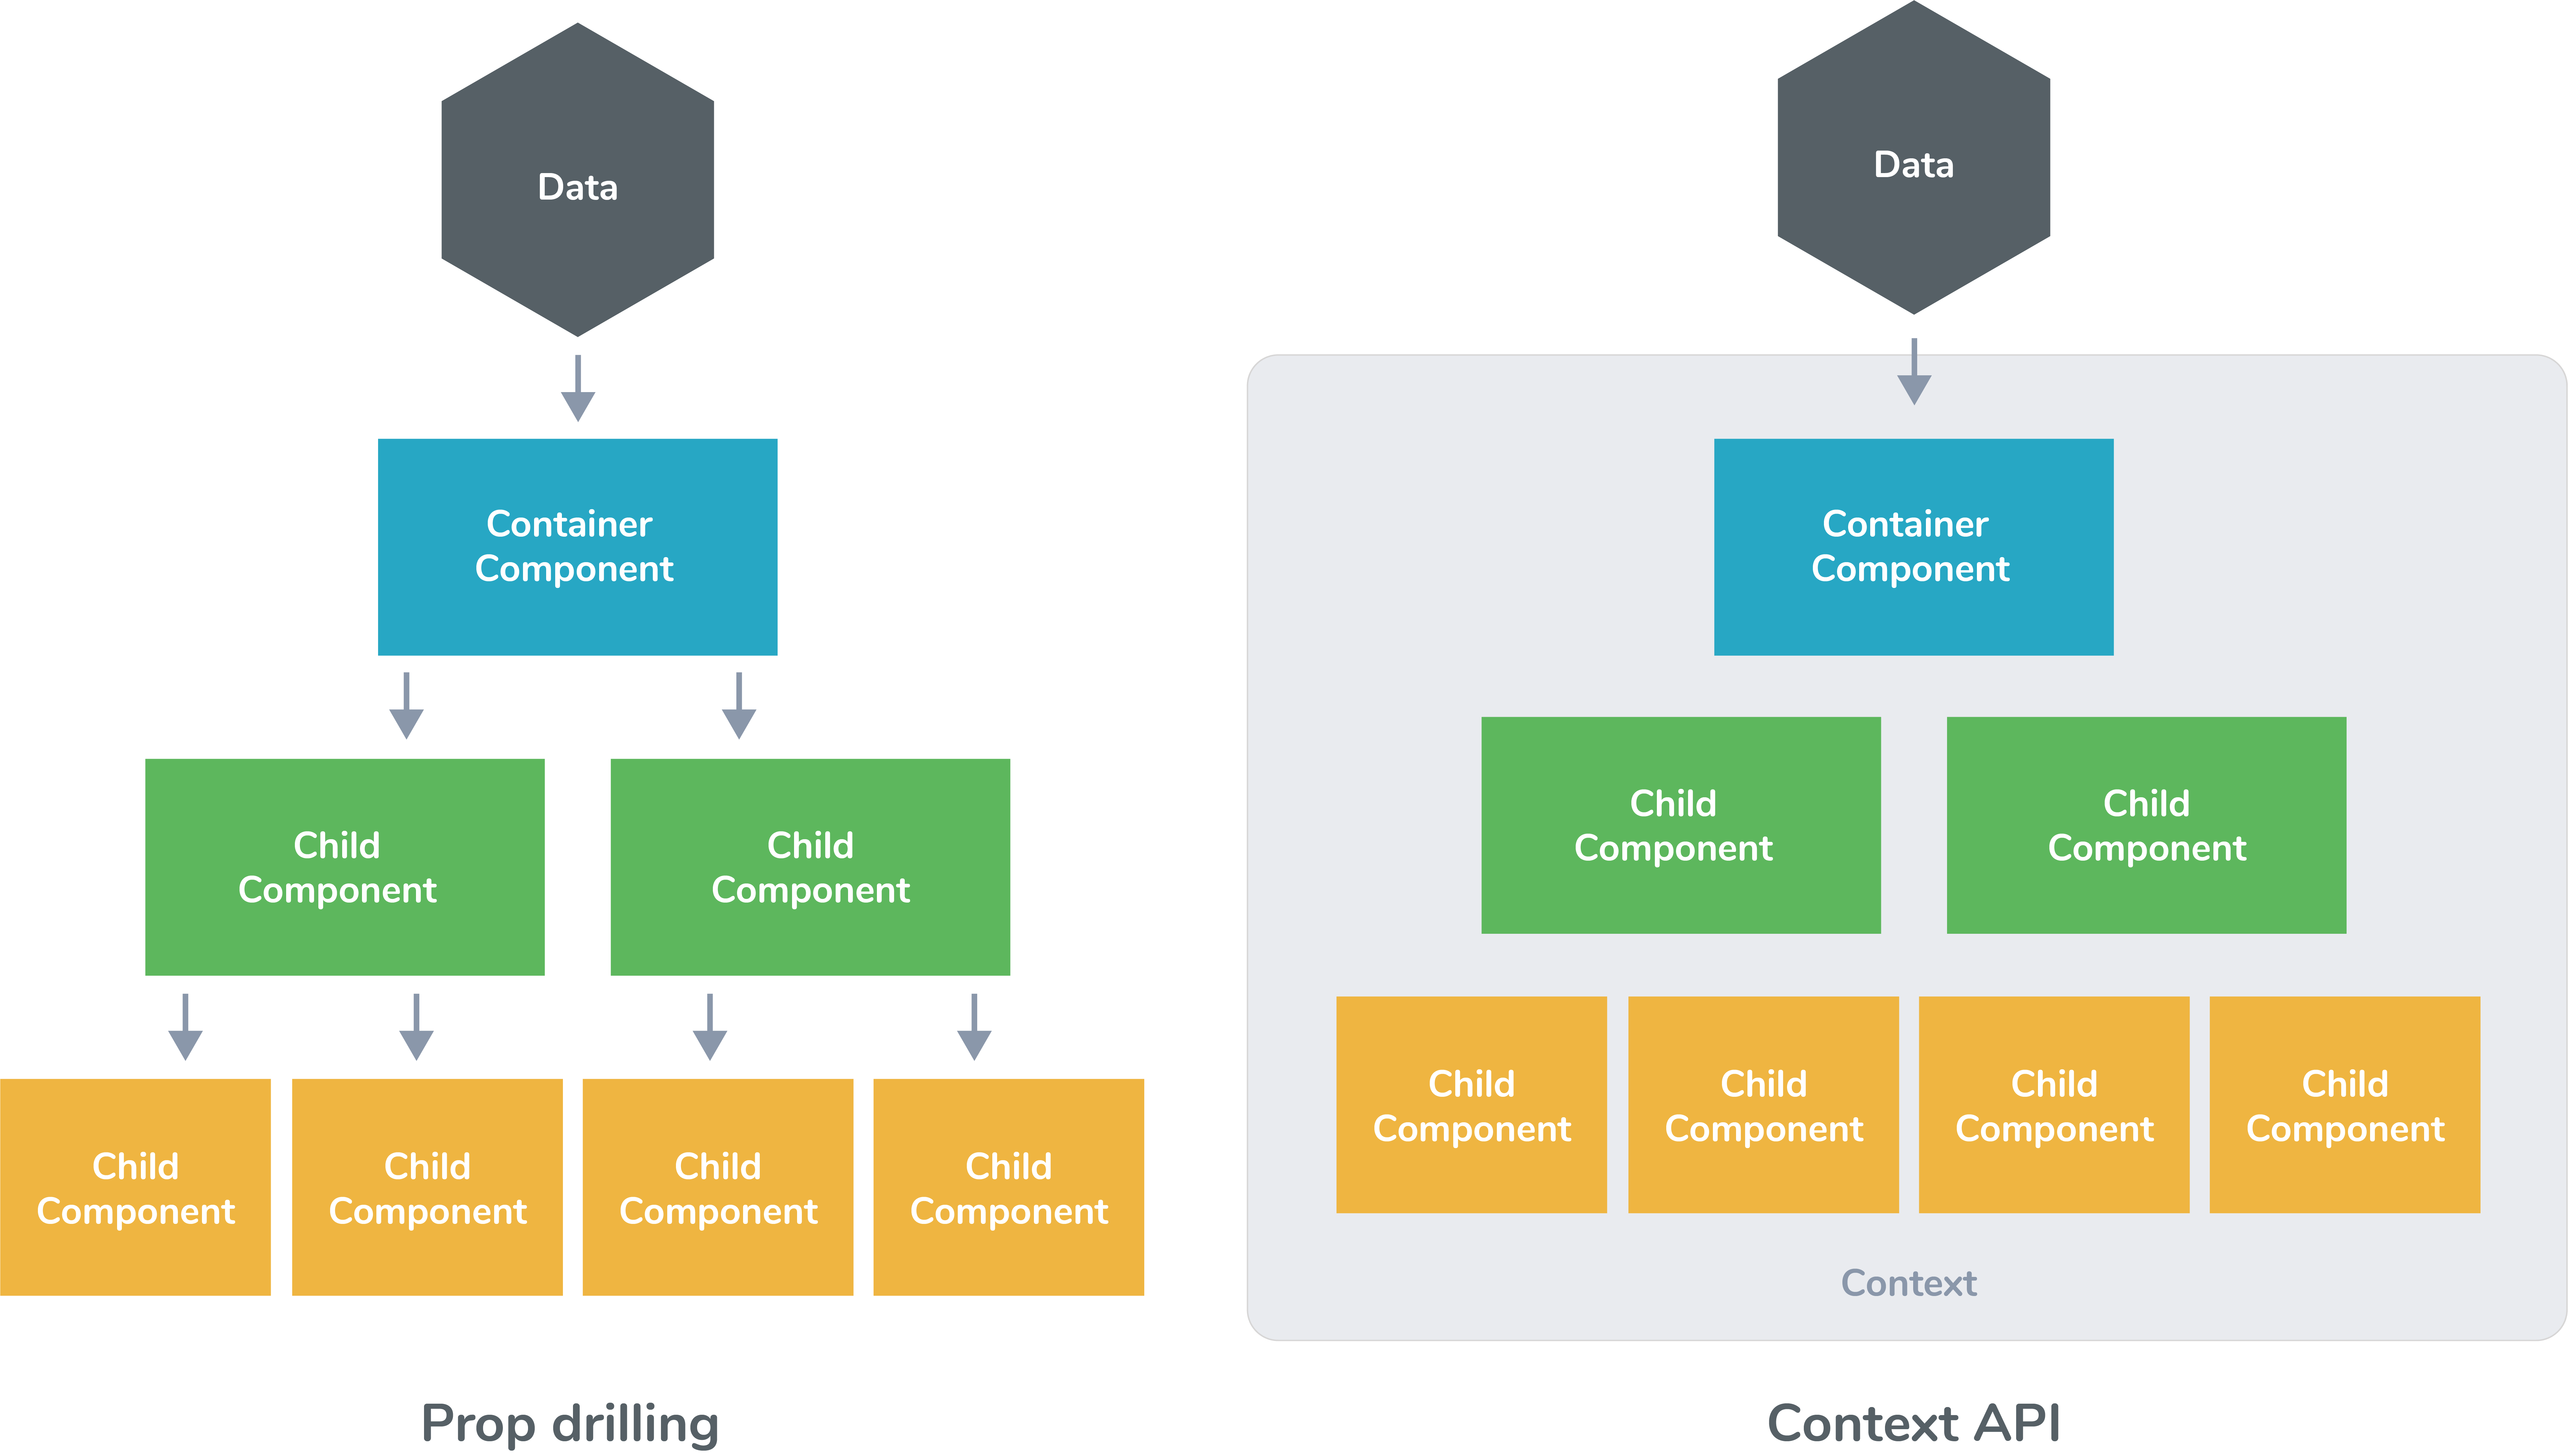
Sometimes while developing React applications, there is a need to pass data from a component that is higher in the hierarchy to a component that is deeply nested.
To pass data between such components, we pass props from a source component and keep passing the prop to the next component in the hierarchy till we reach the deeply nested component.
The disadvantage of using prop drilling is that the components that should otherwise be not aware of the data have access to the data.
17. What are error boundaries?
Introduced in version 16 of React, Error boundaries provide a way for us to catch errors that occur in the render phase.
What is an error boundary?Any component which uses one of the following lifecycle methods is considered an error boundary.
In what places can an error boundary detect an error?
- Render phase
- Inside a lifecycle method
- Inside the constructor
Without using error boundaries:class CounterComponent extends React.Component{
constructor(props){
super(props);
this.state = {
counterValue: 0
}
this.incrementCounter = this.incrementCounter.bind(this);
}
incrementCounter(){
this.setState(prevState => counterValue = prevState+1);
}
render(){
if(this.state.counter === 2){
throw new Error('Crashed');
}
return(
<div>
<button onClick={this.incrementCounter}>Increment Value</button>
<p>Value of counter: {this.state.counterValue}</p>
</div>
)
}
}
In the code above, when the counterValue equals to 2, we throw an error inside the render method.
When we are not using the error boundary, instead of seeing an error, we see a blank page.
Since any error inside the render method leads to unmounting of the component.
To display an error that occurs inside the render method, we use error boundaries.
With error boundaries:As mentioned above, error boundary is a component using one or both of the following methods:
static getDerivedStateFromError and componentDidCatch.Let’s create an error boundary to handle errors in render phase:
class ErrorBoundary extends React.Component {
 constructor(props) {
   super(props);
   this.state = { hasError: false };
 }

 static getDerivedStateFromError(error) {
   return { hasError: true };
 }
  componentDidCatch(error, errorInfo) {
   logErrorToMyService(error, errorInfo);
 }

 render() {
   if (this.state.hasError) {
     return <h4>Something went wrong</h4>
   }
   return this.props.children;
 }
}
In the code above,
getDerivedStateFromError function renders the fallback UI interface when the render method has an error.
componentDidCatch logs the error information to an error tracking service.
Now with error boundary, we can render the CounterComponent in the following way:
<ErrorBoundary>
  <CounterComponent/>
</ErrorBoundary>


 . This is not a Pointer.